HA高可用

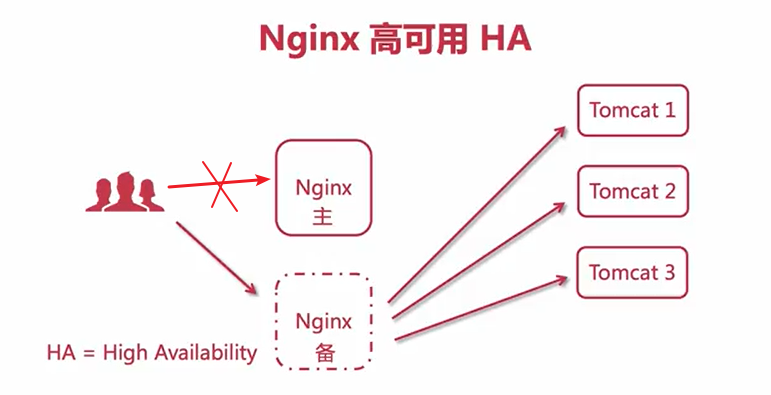
HA高可用架构图

Keepalived介绍

解决单点故障

组件免费

可以实现高可用HA机制

基于VRRP协议

检测nginx状态,发生故障切换到备用机,还可邮件通知管理员。
主机修复完成可以通过keepalived自动加入内网,重新成为主机,备用机会让主机继续工作
一切过程由keepalived处理,人工干预的只有修复出故障的nginx节点

VRRP协议

Virtual Router Redundance Protocol(虚拟路由冗余协议)

解决内网单机故障的路由协议

构建有多个路由器 MASTER BACKUP

虚拟IP - VIP (Virtual IP Address)

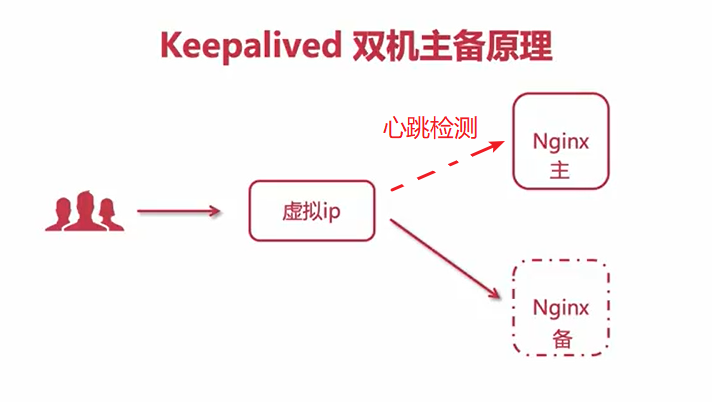
keepalive双机主备原理

KeepAlived双机主备原理

用户请求虚拟ip虚拟ip与nginx绑定到一起。

由于keepalived会进行心跳检测nginx挂了后虚拟ip会与我们的备用nginx绑定到一起。

主备节点配置需要保持一致}(如果备用节点机器配置低于主节点机器可能发生瞬间宕机的情况)

安装Keepalived

安装libnl/libnl-3依赖

1
yum -y install libnl libnl-devel

打开keepalived官网选择download选择响应的版本进行下载并上传到服务器。

解压安装包

进入目录执行命令进行配置生成配置文件

1
./configure --prefix=/usr/local/keepalived --sysconf=/etc

各个参数代表的含义

参数 解释
–prefix 指定keepalived安装位置
–sysconf 核心配置文件路径(要是不设置到这个目录下面的话后面日志会报一个错在/etc目录下找不到keepalived,核心配置文件路径为/etc/keepalived/keepalived.conf)

修改核心配置文件

主节点配置文件

1
2
3
4
5
6
7
8
9
10
11
12
13
14
15
16
17
18
19
20
21
22
23
24
25
26
global_defs {
# 路由id:当前安装keepalived的节点主机标识符,保证全局唯一
router_id keep_001
}

vrrp_instance VI_1 {
# 表示状态是MASTER主机还是备用机BACKUP
state MASTER
# 该实例绑定的网卡(可以使用 ip addr 执行查看)
interface ens33
# 虚拟路由Id,保证主备节点一致即可
virtual_router_id 101
# 权重,master权重一般高于backup,如果有多个,那就是选举,谁的权重高,谁就当选
priority 100
# 主备之间同步检查时间间隔,单位秒
advert_int 1
# 认证权限密码,防止非法节点进入
authentication {
auth_type PASS
auth_pass 1111
}
# 虚拟出来的ip,可以有多个(vip)
virtual_ipaddress {
192.168.88.88
}
}

备用节点配置文件

1
2
3
4
5
6
7
8
9
10
11
12
13
14
15
16
17
18
19
20
21
22
23
24
25
26
global_defs {
# 路由id:当前安装keepalived的节点主机标识符,保证全局唯一
router_id keep_002
}

vrrp_instance VI_1 {
# 表示状态是MASTER主机还是备用机BACKUP
state BACKUP
# 该实例绑定的网卡(可以使用 ip addr 执行查看)
interface ens33
# 虚拟路由Id,保证主备节点一致即可
virtual_router_id 101
# 权重,master权重一般高于backup,如果有多个,那就是选举,谁的权重高,谁就当选
priority 80
# 主备之间同步检查时间间隔,单位秒
advert_int 1
# 认证权限密码,防止非法节点进入
authentication {
auth_type PASS
auth_pass 1111
}
# 虚拟出来的ip,可以有多个(vip)
virtual_ipaddress {
192.168.88.88
}
}

安装定时任务

  • 安装定时任务(centos6或centos7已经子弹)
1
yum install crontabs

查看当前已经存在的定时任务

1
crontab -l

编辑定时任务

1
crontab -e

编辑并添加一行新的任务

  • 前面是表达式,后面是要定时执行的脚本
    1
    */1 * * * * /usr/local/nginx/sbin/cut_my_log.sh

重启定时任务

1
service crond restart

定时任务常用命令

命令 解释
service crond restart 启动服务
service crond stop 关闭服务
service crond restart 重启服务
service crond reload 重新载入配置
crontab -e 编辑任务
crontab -l 查看任务列表

nginx默认配置文件

1
2
3
4
5
6
7
8
9
10
11
12
13
14
15
16
17
18
19
20
21
22
23
24
25
26
27
28
29
30
31
32
33
34
35
36
37
38
39
40
41
42
43
44
45
46
47
48
49
50
51
52
53
54
55
56
57
58
59
60
61
62
63
64
65
66
67
68
69
70
71
72
73
74
75
76
77
78
79
80
81
82
83
84
85
86
87
88
89
90
91
92
93
94
95
96
97
98
99
100
101
102
103
104
105
106
107
108
109
110
111
112
113
114
115
116
117
118
119
120
121
122
123
124
125
126
127
128
129
130
131
132
133
134
135
136
137
138
139
140
141
142
143
144
145
146
147
148
149
150
151
152
153
154
155
156
157
158
159
160
161
162
163
164
165
166
167
168
169
170
171
172
173
174
175
176
177
178
179
180
181
182
183
184
185
186
#user可以配置文件目录访问的用户
#user nobody;
# worker_processes可以指定工作进程的数量
worker_processes 1;

#error_log logs/error.log;
#error_log logs/error.log notice;
#error_log logs/error.log info;

#pid logs/nginx.pid;

#事件处理
events {
   use epoll; #默认使用epoll
   worker_connections 1024;
   #每个worker工作进程允许连接客户端的最大连接数(可以配置)
   #nginx之所以能处理高并发就是因为这里及nginx的事件处理模型
}


http {
   #include包含导入外部文件(mime.types在config目录下,包含了平时请求包含的类型),提高可读性
   #我们自己通过include导入server配置也是没有问题的(导入配置一定要记得加分号)
   include       mime.types;
   #默认的type类型
   default_type application/octet-stream;

   #日志格式的配置(默认自带日志格式不需要配置/如果需要定制化日志格式可以对其进行配置)
   #log_format main '$remote_addr - $remote_user [$time_local] "$request" '
# '$status $body_bytes_sent "$http_referer" '
# '"$http_user_agent" "$http_x_forwarded_for"';

   #http请求日志路径,同时代表我们nginx的性能也得到了提升
   #access_log logs/access.log main;
   #打开sendfile可开启文件的高效传输
   sendfile       on;
   #开启sendfile才可以开启tcp_nopush,表示数据包累积到一定大小过后再开始发送,提升文件传输的效率(类比外卖小哥打包送餐放到集装箱提高工作效率)/不开启则使用同步阻塞的方式,效率是极其低下的。
   #tcp_nopush     on;

   #keepalive_timeout客户端连接服务器的超时时间(以秒为单位),每个客户端连接服务器可以保持连接的时间
   #keepalive_timeout 0;
keepalive_timeout 65;
   
   #内容传输进行压缩,节约服务器带宽的开销,不过压缩肯定会消耗服务器的性能
   #gzip on;

   #限制最小压缩,文件内容小于1个字节就不会对其进行压缩
   #gzip_min_length 1;

   #定义压缩的级别(压缩比,文件越大,压缩越多,但是cpu消耗就更多)
#gzip_min_lenght 3;

   #定义压缩文件的类型
   #gzip_types text/plain application/javascript application/x-javascript text/css application/xml text/javascript application/x-httpd-php image/jpeg image/gif image/png application/json

   #为虚拟主机配置监听信息(可以配置多块)
   server {
       #监听的端口号
       listen       80;
       #服务器名称(可以是备案过后域名或ip或者是localhost)
       server_name localhost;

#charset koi8-r;

#access_log logs/host.access.log main;

       #路由,找到对应的页面
       location / {
           #资源路径(可以是绝对路径也可以是相对路径,这里是相对路径)
           root   html;
           #根路径默认访问的资源
           index index.html index.htm;
}

       #错误页面展示
       #error_page 404             /404.html;

       #发生50x错误的时候重定向到相关错误页面
       # redirect server error pages to the static page /50x.html
#
error_page 500 502 503 504 /50x.html;
location = /50x.html {
root html;
}

# proxy the PHP scripts to Apache listening on 127.0.0.1:80
#
#location ~ \.php$ {
# proxy_pass http://127.0.0.1;
#}

# pass the PHP scripts to FastCGI server listening on 127.0.0.1:9000
#
#location ~ \.php$ {
# root html;
# fastcgi_pass 127.0.0.1:9000;
# fastcgi_index index.php;
# fastcgi_param SCRIPT_FILENAME /scripts$fastcgi_script_name;
# include fastcgi_params;
#}

# deny access to .htaccess files, if Apache's document root
# concurs with nginx's one
#
#location ~ /\.ht {
# deny all;
#}
       #以上配置多个资源路径

       #以别名形式配置路径(隐藏真实资源路径)
       #location /resource {
       #    #将资源路径resource映射到/xxx/xxx/xxx/resource路径下
       #    alias /xxx/xxx/xxx/resource;
       #}

   }
   #配置上游服务器
   upstream tomcats {
       #默认使用轮询策略,添加weight根据权重选择执行的机器
       server 192.168.1.101:8080 weight=1;
server 192.168.1.102:8080;
server 192.168.1.103:8080;
}


# another virtual host using mix of IP-, name-, and port-based configuration
#
#server {
# listen 8000;
# listen somename:8080;
# server_name somename alias another.alias;
   #允许跨域请求的域,*代表所有
   #   add_header 'Access-Control-Allow-Origin' *;
   #允许带上cookie请求
   #   add_header 'Access-Control-Allow-Credentials' 'true';
   #允许请求的方法get/post/put/delete
   #   add_header 'Access-Control-Allow-Method' *;
   #允许请求的header
   #   add_header 'Access-Control-Allow-Header' *;
   #对源站点验证(静态资源防盗链)
   #valid_referers *.xxx.com;
#if($invalid_refer) {
   #    return 404;
   #}
   #   add_header 'Access-Control-Allow-Header' *;
   #   location / {
# root html;
# index index.html index.htm;
   #       #静态资源访问缓存过期时间,文件发生更改也会不使用缓存。
   #       expires 10s;
   #       #指定缓存过期时间为22点30分
   #       expires @22h30m
   #       #缓存在1个小时之前已经过期
   #       expires -1h
   #       #不设置缓存
   #       expires epoch
   #       #关闭nginx缓存(默认),浏览器还是有缓存机制
   #       expires off
   #       #最大过期时间(相当于永不过期)
   #       expires max
   #   }
#}


# HTTPS server
#
#server {
# listen 443 ssl;
# server_name localhost;

# ssl_certificate cert.pem;
# ssl_certificate_key cert.key;

# ssl_session_cache shared:SSL:1m;
# ssl_session_timeout 5m;

# ssl_ciphers HIGH:!aNULL:!MD5;
# ssl_prefer_server_ciphers on;

# location / {
# root html;
# index index.html index.htm;
# }
#}

}

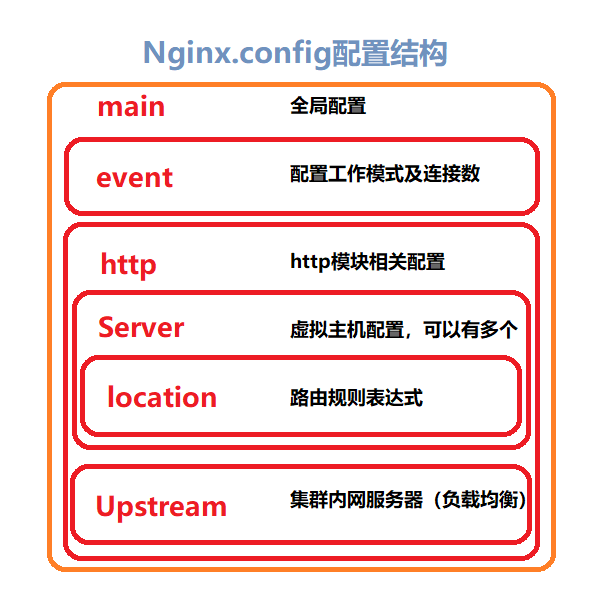
nginx配置结构

nginx配置结构

校验nginx配置文件是否正确

1
./nginx -t

修改配置文件过后需要重新装载nginx

  • 重新装载nginx的命令如下
1
./nginx -s reload

Nginx进程模型

查看nginx进程

  • 查看nginx进程命令
1
ps -ef | grep nginx
  • 命令执行结果
1
2
3
root       4640      1  0 13:59 ?        00:00:00 nginx: master process ./nginx
nobody 4641 4640 0 13:59 ? 00:00:00 nginx: worker process
root 4723 4668 0 15:22 pts/0 00:00:00 grep --color=auto nginx

根据命令执行结果我们可以看到一共是有两个nginx的进程,第1个是nginx:master主进程,第2个是nginx:worker工作进程,实际上我们是可以通过配置文件指定nginx:worker的工作进程的数量的,配置文件属性如下。

1
worker_processes  1;	#指定工作进程的数量

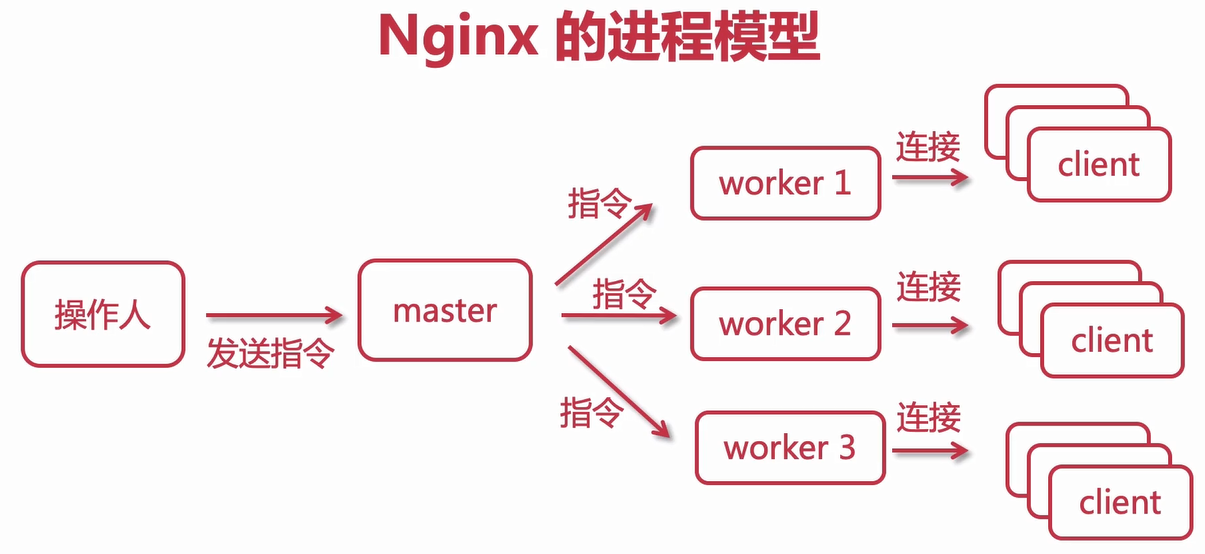
nginx进程模型

  • nginx:master进程是主进程,对nginx:worker进程进行管理

  • nginx:worker进程是工作进程,为nginx:master进程服务

  • nginx:master会发送信号给nginx:worker进程,实例信号指令如下

1
2
3
4
./nginx -s stop
./nginx -s quit
./nginx -s reload
./nginx -t

//todo多看看nginx的进程模型及nginx抢占机制这块知识
nginx进程模型

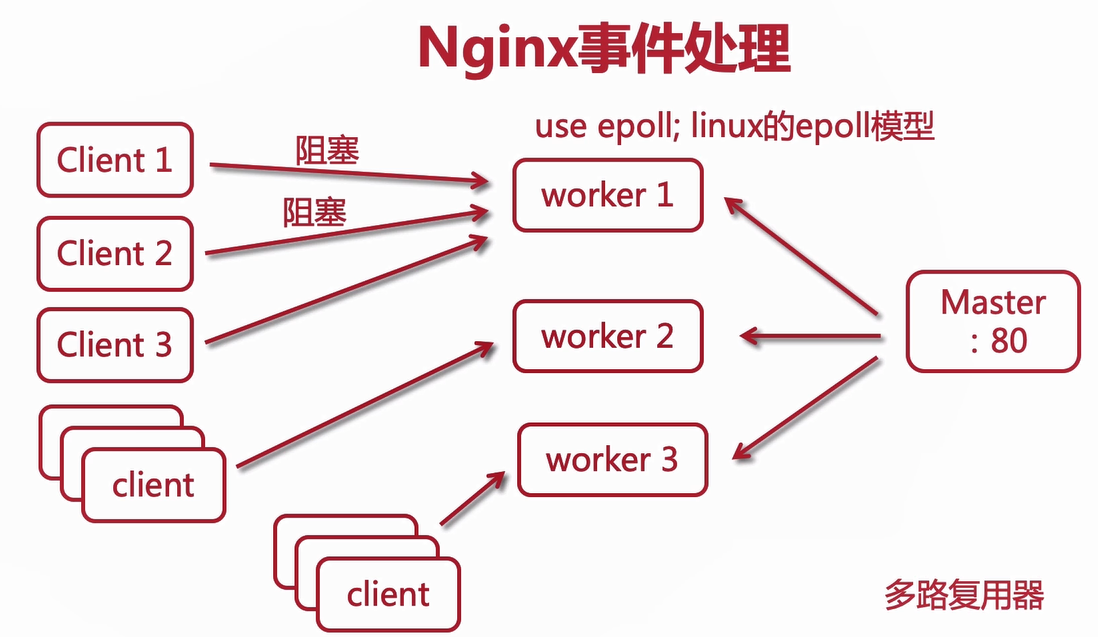
nginx事件处理模型

  • nginx事件处理模型类似于多路复用

nginx事件处理模型

nginx常见的问题

open “/XXX/XXX/nginx.pid” failed (2: No such file or directory)

  • 首先进入pid目录
1
cd /XXX/XXX
  • 如果提示cd: /XXX/XXX:没有哪个文件或目录,创建目录
1
mkdir /XXX/XXX

nginx:[error] invalid PID number “” “in /xxx/xxx/nginx.pid”

  • 该错误告诉我们这个pid无效,我们只需要重新指定一下nginx的配置文件

  • 首先查看nginx的帮助命令,在nginx安装目录下的sbin目录下执行

1
./nginx -h
  • 命令结果
1
2
3
4
5
6
7
8
9
10
11
12
13
14
15
16
17
18
Options:
 //-c查看帮助
 -?,-h         : this help
 //查看版本
 -v           : show version and exit
 //版本及具体编译安装环境配置参数
 -V           : show version and configure options then exit
 //校验配置文件是否正确
 -t           : test configuration and exit
-T : test configuration, dump it and exit
-q : suppress non-error messages during configuration testing
 //发送信号给nginx:master进程,stop停止/quit优雅停止/reopen重新打开/reload重新装载
 -s signal     : send signal to a master process: stop, quit, reopen, reload
 //nginx安装路径
 -p prefix     : set prefix path (default: /usr/local/nginx/)
//-c指定配置文件路径
 -c filename   : set configuration file (default: conf/nginx.conf)
-g directives : set global directives out of configuration file
  • 执行命令
1
./nginx -c /.../conf/nginx.conf

nginx日志切割

  • 随着时间的推移项目日志越大,达到10GB甚至几十GB,不便于日志分析,我们需要对日志进行切割

手动切割日志的脚本

  • 创建一个可执行的shell脚本:cut_my_log.sh,内容如下:
1
2
3
4
5
6
7
8
#!/bin/bash
LOG_PATH="/var/log/nginx"
RECORD_TIME=$(date -d "yesterday" +%Y-%m-%d+%H:%M)
PID=/var/run/nginx/nginx.pid
mv ${LOG_PATH}/access.log ${LOG_PATH}/access.${RECORD_TIME}.log
mv ${LOG_PATH}/error.log ${LOG_PATH}/access.${RECORD_TIME}.log
#向nginx:master进程发送信号,用于重新打开日志文件
kill -USR1 `cat $PID`
  • 为cut_my_log.sh脚本添加执行权限
1
chmod +x cut_my_log.sh

nginx匹配规则

  • location / #路径存在即可访问

  • location = / #精确匹配 (这里只能访问到根)

  • location ~ .(GIF|png|bmp|jpg|jpeg) #正则表达式不带*区分大小写

  • location ~* .(GIF|png|bmp|jpg|jpeg) #正则表达式带*不区分大小写

  • location ^~ /xxx/xxx #不使用正则表达式以/xxx/xxx路径开头

upstream指令参数

  • upstream指定参数以key与value的形式配置到ip及端口的后面如下所示
1
2
3
upstream tomcats {
   server 192.168.1.101:8080 key=value;
}

指令参数


max_conns=count (根据服务器性能设置过载保护做限流现作用,每个工作进程都能生效,在1.11.5之前这个参数只适用于商业版本)


slow_start=time(服务器恢复过后经过time的时间过后再加入到upstream集群中,商业版nginx中才能使用)


down 配置该服务器在集群中标记为不可用状态


back 标记该服务是一台备用机,集群中其它服务器不可用的时候会启动该台服务器进行备用


max_fails=count最大失败次数

fail_time_out=time

以上两个参数连用表示time时间内失败次数超过count就会将服务踢出upstream集群中,15s后再尝试请求是否正常如此往复


keepalive=count提高吞吐量

1
2
3
4
5
6
7
8
9
10
11
12
13
14
15
16
upstream tomcats {
server 192.168.1.101:8080;
#保持长连接的数量
keepalive 32;
}
server {
listen 80;
server_name www.tomcats.com;
location / {
proxy_pass http://tomcats;
#协议版本号http1.1才支持保持长连接避免服务经常创建关闭消耗服务器资源
proxy_http_version 1.1;
#清除collection中的信息
proxy_set_header Connection "";
}
}

ip_hash ip地址取模请求打到固定的服务器上面

  • 配置方式如下即可

  • 不同ip的客户端会会固定的请求到不同的固定服务器

1
2
3
4
5
6
7
upstream tomcats {
#ip_hash根据请求的ip地址与集群中服务器的数量进行求模操作
ip_hash;
server 192.168.1.101:8080;
server 192.168.1.102:8080;
server 192.168.1.103:8080;
}

ip_hash在nginx源码中的算法

  • ip_hash源码在安装包内/src/http/modules/ngx_http_upstream_ip_hash_module.c文件中

  • 源码中通过”.”对ip进行切割的数组长度为4,索引为0~3,取索引2进行取模,所以在本地内网环境访问服务器的时候看不出来不同的ip打到了相同的服务器

    ip_hash注意

  • 使用ip_hash的时候如果其中一台服务器出现了问题我们需要移除不能在upstrem中直接删除,否则hash的值会发生改变,请求的服务器就会发生改变,我们应该将服务器标记为down不被请求。

ip_hash带来的问题

  • 如果服务器数量发生变化,无论是新增或者减少都会导致hash算法算出来的值发生变化,会话丢失,缓存无法访问等问题。

一致性哈希算法

  • 一致性哈希算法是将用户哈希到这个环上,相同的用户在访问的主机不会发生变化,只有当主机节点数量发生变化的时候才会有少量的用户主机请求的服务器发生变化,保证大部分用户请求的主机不会发生变化。

原有的服务器及用户状态

原有节点及用户状态

服务器数量减少

服务器数量减少

  • 图中节点3移除了,原有访问节点3的2个少量用户转移到了节点4,其余节点上的用户访问的服务器不发生变化

假如说要增加服务器

服务器数量增加

  • 图中我们看出服务器数量增加只有一个用户变更了服务器的请求地址,其余用户不发生改变。

Nginx负载均衡算法有哪些

  • nginx默认使用轮询算法。

  • ip_hash根据请求客户端的ip进行哈希请求到固定的服务器。

  • url_hash根据url地址进行hash请求到固定的服务器。

  • least_conn哪台服务器的连接数少就连接到哪一台服务器

配置nginx静态资源文件缓存过期时间

  • 在nginx配置结构中的http层进行配置
1
2
3
4
5
6
7
8
9
10
11
proxy_cache_path /usr/local/nginx/upstream_cache keys_zone=mycache:5m max_size=1g inactive=30s use_temp_path=off;

server {
listen 80;
server_name www.tomcats.com;

#静态资源开启并且使用缓存
proxy_cache mycache;
#针对200和304状态码的缓存设置过期时间为8h
proxy_cache_valid 200 304 8h;
}
  • proxy_cache_path 设置缓存保存的目录

  • /usr/local/nginx/upstream_cache是定义的保存缓存的路径

  • keys_zone 设置共享内存一级占用空间的大小

  • max_size 设置缓存大小

  • inactive 超过此时间缓存自动清理

  • use_temp_path 关闭临时目录

动静分离

什么是动静分离?

动静分离本质是将前端静态资源与我们后端服务的接口分开减小后端服务器的压力,提高静态资源的访问速度(静态资源可以是被缓存的访问起来更快,后端不需要渲染页面)

静态数据:css/js/html/images/audios/videos/…

动态数据:后端接口,不同时间得到的响应可能不同

动静分离的特点

分布式

前后端接口

静态归nginx

接口服务化

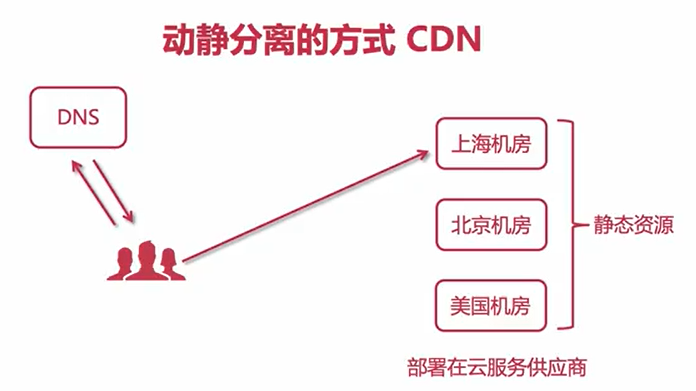
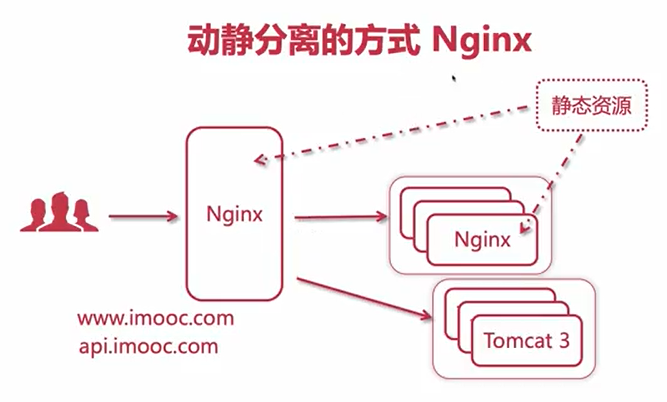
动静分离实现方式

使用cdn加速

cdm加速

使用nginx实现动静分离

nginx

软件推荐

nginx配置管理工具nginxWebUI

自建ngrok,从此抛弃花生壳教程地址

下载并上传nginx安装包到linux

安装依赖环境

  • 安装gcc环境
1
yum install -y gcc-c++
  • 安装pcre库用于正则表达式
1
yum install -y pcre pcre-devel
  • zlib压缩和解压缩依赖
1
yum install -y zlib zlib-devel
  • ssl安全的加密的套接字协议,用与HTTP的安全传输,也就是https
1
yum install -y openssl openssl-devel

解压nginx

1
tar -zxvf nginx-1.16.1.tar.gz

创建nginx临时目录

1
mkdir /var/temp/nginx -p

在nginx目录下输入如下命令进行配置,目的是为了创建makefile文件

  • 参数命令

在安装包解压目录下复制如下命令直接生成makefile文件

1
2
3
4
5
6
7
8
9
10
11
12
13
./configure \
--prefix=/usr/local/nginx \
--pid-path=/var/run/nginx/nginx.pid \
--lock-path=/var/lock/nginx.lock \
--error-log-path=/var/log/nginx/error.log \
--http-log-path=/var/log/nginx/access.log \
--with-http_gzip_static_module \
--http-client-body-temp-path=/var/temp/nginx/client \
--http-proxy-temp-path=/var/temp/nginx/proxy \
--http-fastcgi-temp-path=/var/temp/nginx/fastcgi \
--http-uwsgi-temp-path=/var/temp/nginx/uwsgi \
--http-scgi-temp-path=/var/temp/nginx/scgi \
--with-http_ssl_module
  • 各个参数代表的含义
参数 解释
–prefix 指定nginx安装位置
–pid-path 指向nginx的pid
–lock-path 锁定安装文件、防止恶意篡改或误操作
–error-log-path 错误日志
–http-log-path http日志
–with-http_gzip_static_module 启动gzip模块,在线实时压缩数据流
–http-client-body-temp-path 设定客户端请求的临时目录
–http-proxy-temp-path 设定http代理临时目录
–http-fastcgi-temp-path 设定fastcgi临时目录
–http-uwsgi-temp-path 设定uwsgi临时目录
–http-scgi-temp-path 设定scgi临时目录
–with-http_ssl_module 如果要配置ssl域名证书需要安装ssl模块

查看安装包目录下的objs目录

查看objs目录下的ngx_modules.c,已经包含ssl相关模块内容如下

1
2
3
4
5
6
7
8
9
10
11
12
13
14
15
16
17
18
19
20
21
22
23
24
25
26
27
28
29
30
31
32
33
34
35
36
37
38
39
40
41
42
43
44
45
46
47
48
49
50
51
52
53
54
55
56
57
58
59
60
61
62
63
64
65
66
67
68
69
70
71
72
73
74
75
76
77
78
79
80
81
82
83
84
85
86
87
88
89
90
91
92
93
94
95
96
97
98
99
100
101
102
103
104
105
106
107
108
109
110
111
112
113
114
115
116
#include <ngx_config.h>
#include <ngx_core.h>


extern ngx_module_t ngx_core_module;
extern ngx_module_t ngx_errlog_module;
extern ngx_module_t ngx_conf_module;
extern ngx_module_t ngx_events_module;
extern ngx_module_t ngx_event_core_module;
extern ngx_module_t ngx_epoll_module;
extern ngx_module_t ngx_openssl_module;
extern ngx_module_t ngx_regex_module;
extern ngx_module_t ngx_http_module;
extern ngx_module_t ngx_http_core_module;
extern ngx_module_t ngx_http_log_module;
extern ngx_module_t ngx_http_upstream_module;
extern ngx_module_t ngx_http_static_module;
extern ngx_module_t ngx_http_gzip_static_module;
extern ngx_module_t ngx_http_autoindex_module;
extern ngx_module_t ngx_http_index_module;
extern ngx_module_t ngx_http_auth_basic_module;
extern ngx_module_t ngx_http_access_module;
extern ngx_module_t ngx_http_limit_conn_module;
extern ngx_module_t ngx_http_limit_req_module;
extern ngx_module_t ngx_http_geo_module;
extern ngx_module_t ngx_http_map_module;
extern ngx_module_t ngx_http_split_clients_module;
extern ngx_module_t ngx_http_referer_module;
extern ngx_module_t ngx_http_rewrite_module;
extern ngx_module_t ngx_http_ssl_module;
extern ngx_module_t ngx_http_proxy_module;
extern ngx_module_t ngx_http_fastcgi_module;
extern ngx_module_t ngx_http_uwsgi_module;
extern ngx_module_t ngx_http_scgi_module;
extern ngx_module_t ngx_http_memcached_module;
extern ngx_module_t ngx_http_empty_gif_module;
extern ngx_module_t ngx_http_browser_module;
extern ngx_module_t ngx_http_upstream_hash_module;
extern ngx_module_t ngx_http_upstream_ip_hash_module;
extern ngx_module_t ngx_http_upstream_least_conn_module;
extern ngx_module_t ngx_http_upstream_keepalive_module;
extern ngx_module_t ngx_http_upstream_zone_module;
extern ngx_module_t ngx_http_write_filter_module;
extern ngx_module_t ngx_http_header_filter_module;
extern ngx_module_t ngx_http_chunked_filter_module;
extern ngx_module_t ngx_http_range_header_filter_module;
extern ngx_module_t ngx_http_gzip_filter_module;
extern ngx_module_t ngx_http_postpone_filter_module;
extern ngx_module_t ngx_http_ssi_filter_module;
extern ngx_module_t ngx_http_charset_filter_module;
extern ngx_module_t ngx_http_userid_filter_module;
extern ngx_module_t ngx_http_headers_filter_module;
extern ngx_module_t ngx_http_copy_filter_module;
extern ngx_module_t ngx_http_range_body_filter_module;
extern ngx_module_t ngx_http_not_modified_filter_module;

ngx_module_t *ngx_modules[] = {
&ngx_core_module,
&ngx_errlog_module,
&ngx_conf_module,
&ngx_events_module,
&ngx_event_core_module,
&ngx_epoll_module,
&ngx_openssl_module,
&ngx_regex_module,
&ngx_http_module,
&ngx_http_core_module,
&ngx_epoll_module,
&ngx_openssl_module,
&ngx_regex_module,
&ngx_http_module,
&ngx_http_core_module,
&ngx_http_log_module,
&ngx_http_upstream_module,
&ngx_http_static_module,
&ngx_http_gzip_static_module,
&ngx_http_autoindex_module,
&ngx_http_index_module,
&ngx_http_auth_basic_module,
&ngx_http_access_module,
&ngx_http_limit_conn_module,
&ngx_http_limit_req_module,
&ngx_http_geo_module,
&ngx_http_map_module,
&ngx_http_split_clients_module,
&ngx_http_referer_module,
&ngx_http_rewrite_module,
&ngx_http_ssl_module,
&ngx_http_proxy_module,
&ngx_http_fastcgi_module,
&ngx_http_uwsgi_module,
&ngx_http_scgi_module,
&ngx_http_memcached_module,
&ngx_http_empty_gif_module,
&ngx_http_browser_module,
&ngx_http_upstream_hash_module,
&ngx_http_upstream_ip_hash_module,
&ngx_http_upstream_least_conn_module,
&ngx_http_upstream_keepalive_module,
&ngx_http_upstream_zone_module,
&ngx_http_write_filter_module,
&ngx_http_header_filter_module,
&ngx_http_chunked_filter_module,
&ngx_http_range_header_filter_module,
&ngx_http_gzip_filter_module,
&ngx_http_postpone_filter_module,
&ngx_http_ssi_filter_module,
&ngx_http_charset_filter_module,
&ngx_http_userid_filter_module,
&ngx_http_headers_filter_module,
&ngx_http_copy_filter_module,
&ngx_http_range_body_filter_module,
&ngx_http_not_modified_filter_module,
NULL
};

通过Makefile进行编译

  • 在安装包解压目录下直接执行如下命令
1
make

安装

1
make install

查看nginx安装目录

1
whereis nginx

启动nginx

1
./nginx

停止nginx

1
./nginx -s stop

注意事项

  • 如果在云服务器安装需要开启默认的nginx端口:80

  • 如果在虚拟机安装,需要关闭防火墙

  • 本地win或mac需要关闭防火墙

@Transaction注解

1
2
3
4
5
6
7
8
9
10
11
12
13
14
15
16
17
18
19
20
21
22
23
24
25
26
27
28
29
30
31
32
33
34
35
36
37
38
39
@Target({ElementType.TYPE, ElementType.METHOD})
@Retention(RetentionPolicy.RUNTIME)
@Inherited
@Documented
public @interface Transactional {
//与value互为别名(互为别名的属性值必须设置默认值;互为别名不能同时设置)
@AliasFor("transactionManager")
String value() default "";
@AliasFor("value")
String transactionManager() default "";

//事物传播行为(默认值Propagation.REQUIRED如果有事务, 那么加入事务, 没有的话新建一个)
Propagation propagation() default Propagation.REQUIRED;

//事物隔离级别
Isolation isolation() default Isolation.DEFAULT;

//事物超时设置
int timeout() default TransactionDefinition.TIMEOUT_DEFAULT;

//设置当前事物是否为只读事物
boolean readOnly() default false;

//当方法中抛出指定异常数组中的异常时,则进行事务回滚
//@Transactional(rollbackFor={RuntimeException.class, Exception.class})
Class<? extends Throwable>[] rollbackFor() default {};

//当方法中抛出指定异常名称数组中的异常时,则进行事务回滚。
//@Transactional(rollbackForClassName={"RuntimeException","Exception"})
String[] rollbackForClassName() default {};

//当方法中抛出指定异常数组中的异常时,不进行事务回滚。
//@Transactional(noRollbackFor={RuntimeException.class, Exception.class})
Class<? extends Throwable>[] noRollbackFor() default {};

//当方法中抛出指定异常名称数组中的异常时,不进行事务回滚。
//@Transactional(noRollbackForClassName={"RuntimeException","Exception"})
String[] noRollbackForClassName() default {};
}

注意

  • 该注解中的方法Transaction#propagation()说明了事物的传播行为返回的是枚举类型Propagation

  • @Transactional 只能被应用到public方法上否则没有事物功能

  • @Transactional 注解可以被应用于接口定义和接口方法

  • Spring团队的建议是你在具体的类(或类的方法)上使用 @Transactional 注解,而不要使用在类所要实现的任何接口上。你当然可以在接口上使用 @Transactional 注解,但是这将只能当你设置了基于接口的代理时它才生效。因为注解是不能继承的,这就意味着如果你正在使用基于类的代理时,那么事务的设置将不能被基于类的代理所识别,而且对象也将不会被事务代理所包装(将被确认为严重的)。

事物的传播行为Propagation

1
2
3
4
5
6
7
8
9
10
11
12
13
14
15
16
17
18
19
20
21
22
public enum Propagation {
//如果有事务, 那么加入事务, 没有的话新建一个(默认)
REQUIRED(TransactionDefinition.PROPAGATION_REQUIRED),

//如果当前调用有事物则使用事物,如果当前调用没有事物则不使用事物
SUPPORTS(TransactionDefinition.PROPAGATION_SUPPORTS),

//必须在一个已有的事务中执行,否则抛出异常
MANDATORY(TransactionDefinition.PROPAGATION_MANDATORY),

//不管是否存在事务,都创建一个新的事务,原来的挂起,新的执行完毕,继续执行老的事务
REQUIRES_NEW(TransactionDefinition.PROPAGATION_REQUIRES_NEW),

//如果当前有事物将事物挂起,自己不使用事物进行数据库操作
NOT_SUPPORTED(TransactionDefinition.PROPAGATION_NOT_SUPPORTED),

//必须在一个没有的事务中执行,否则抛出异常(与Propagation.MANDATORY相反)
NEVER(TransactionDefinition.PROPAGATION_NEVER),

//支持当前事务,如果当前事务存在,则执行一个嵌套事务,当前事务提交时嵌套事物才能提交;如果当前没有事务,就新建一个事务。
NESTED(TransactionDefinition.PROPAGATION_NESTED);
}

事物隔离级别Isolation

1
2
3
4
5
6
7
8
9
10
11
12
public enum Isolation {
//使用数据库默认的隔离级别
DEFAULT(TransactionDefinition.ISOLATION_DEFAULT),
//读未提交(脏读、不可重复读、幻读)
READ_UNCOMMITTED(TransactionDefinition.ISOLATION_READ_UNCOMMITTED),
//不可重复读(解决:脏读/未解决:不可重复读、幻读)
READ_COMMITTED(TransactionDefinition.ISOLATION_READ_COMMITTED),
//可重复读(mysql默认使用的隔离级别)(解决:脏读、不可重复读/未解决:幻读)
REPEATABLE_READ(TransactionDefinition.ISOLATION_REPEATABLE_READ),
//串行化(解决所有问题)
SERIALIZABLE(TransactionDefinition.ISOLATION_SERIALIZABLE);
}

事物的基本要素(ACID)

原子性(Atomicity)

  • 事务开始后所有操作,要么全部做完,要么全部不做,不可能停滞在中间环节。事务执行过程中出错,会回滚到事务开始前的状态,所有的操作就像没有发生一样。也就是说事务是一个不可分割的整体,就像化学中学过的原子,是物质构成的基本单位。

一致性(Consistency)

  • 事务开始前和结束后,数据库的完整性约束没有被破坏 。比如A向B转账,不可能A扣了钱,B却没收到。

隔离性(Isolation)

  • 同一时间,只允许一个事务请求同一数据,不同的事务之间彼此没有任何干扰。

持久性(Durability)

  • 事务完成后,事务对数据库的所有更新将被保存到数据库,不能回滚。

事物的并发问题

脏读

  • 事务A读取了事务B更新的数据,然后B回滚操作,那么A读取到的数据是脏数据

不可重复读

  • 事务 A 多次读取同一数据,事务 B 在事务A多次读取的过程中,对数据作了更新并提交,导致事务A多次读取同一数据时,结果 不一致。

幻读

  • 系统管理员A将数据库中所有学生的成绩从具体分数改为ABCDE等级,但是系统管理员B就在这个时候插入了一条具体分数的记录,当系统管理员A改结束后发现还有一条记录没有改过来,就好像发生了幻觉一样,这就叫幻读。

注意

1
注意:不可重复读的和幻读很容易混淆,不可重复读侧重于修改,幻读侧重于新增或删除。解决不可重复读的问题只需锁住满足条件的行,解决幻读需要锁表。

  • 需求:由于我们的项目是父子结构的Maven项目,可能我们在parent项目中依赖了很多基础包(可能包含有redis,数据库的相关包),那我们的子项目全部依赖parent,但是可能我们的服务是消息队列(不需要Redis/数据库),定时任务服务(不需要Redis)等等,所以我们需要排序不需要的组件

排除Maven依赖使用exclusion标签

1
2
3
4
5
6
7
8
9
10
11
<dependency>  
<groupId>com.nk</groupId>
<artifactId>system</artifactId>
<version>0.0.1</version>
<exclusions>
<exclusion>
<groupId>org.slf4j</groupId>
<artifactId>slf4j-log4j12</artifactId>
</exclusion>
</exclusions>
</dependency>

禁用自动化配置避免今安在自动化配置

1
@EnableAutoConfiguration(exclude={DataSourceAutoConfiguration.class})

启动方法

  • Application#main()
1
2
3
public static void main(String[] args) {
SpringApplication.run(GoodsApplication.class, args);
}
  • SpringApplication#run()
1
2
3
4
5
6
7
8
9
/**
* 一个静态助手通过传入的source使用默认配置
* 运行一个spring应用,这个默认的配置来自于@SpringBootApplication注解
* args参数通常将main()方法中的参数传入即可
* @return 返回一个正在运行的上下文对象 {@link ApplicationContext}
*/
public static ConfigurableApplicationContext run(Class<?> primarySource, String... args) {
return run(new Class<?>[] { primarySource }, args);
}

Application启动类上的注解

  • @SpringBootApplication
1
2
3
4
5
6
7
8
9
10
@Target(ElementType.TYPE)
@Retention(RetentionPolicy.RUNTIME)
@Documented
@Inherited
//@Configuration的派生注解指定该类是一个配置类
@SpringBootConfiguration
//开启自动配置(重点/约定大于配置)
@EnableAutoConfiguration
//扫描Appliaction类下的所有子包
@ComponentScan(excludeFilters = { @Filter(type = FilterType.CUSTOM, classes = TypeExcludeFilter.class),@Filter(type = FilterType.CUSTOM, classes = AutoConfigurationExcludeFilter.class) })

@EnableAutoConfiguration (约定大于配置)

1
2
3
4
5
6
7
@Target(ElementType.TYPE)
@Retention(RetentionPolicy.RUNTIME)
@Documented
@Inherited
@AutoConfigurationPackage
//import导入各种ConfigBean 自动装配的选择器(可以选择很多自动装配的类)
@Import(AutoConfigurationImportSelector.class)

@Import(AutoConfigurationImportSelector.class) 选择自动装配的类

  • AutoConfigurationImportSelector#selectImports()是该类最重要的方法,用于选择需要装配的类

  • AutoConfigurationImportSelector#getAutoConfigurationEntry() 获取需要自动装配的类

1
2
3
4
5
6
7
8
9
10
11
12
13
14
15
16
17
18
19
20
21
22
23
/**
* Return the {@link AutoConfigurationEntry} based on the {@link AnnotationMetadata}
* of the importing {@link Configuration @Configuration} class.
* @param autoConfigurationMetadata the auto-configuration metadata
* @param annotationMetadata the annotation metadata of the configuration class
* @return the auto-configurations that should be imported
*/
protected AutoConfigurationEntry getAutoConfigurationEntry(AutoConfigurationMetadata autoConfigurationMetadata,
AnnotationMetadata annotationMetadata) {
if (!isEnabled(annotationMetadata)) {
return EMPTY_ENTRY;
}
AnnotationAttributes attributes = getAttributes(annotationMetadata);
//获取候选的自动装配的类
List<String> configurations = getCandidateConfigurations(annotationMetadata, attributes);
configurations = removeDuplicates(configurations);
Set<String> exclusions = getExclusions(annotationMetadata, attributes);
checkExcludedClasses(configurations, exclusions);
configurations.removeAll(exclusions);
configurations = filter(configurations, autoConfigurationMetadata);
fireAutoConfigurationImportEvents(configurations, exclusions);
return new AutoConfigurationEntry(configurations, exclusions);
}
  • AutoConfigurationImportSelector#getCandidateConfigurations() 获取候选自动配置
1
2
3
4
5
6
7
8
9
10
11
12
13
14
15
16
17
18
/**
* Return the auto-configuration class names that should be considered. By default
* this method will load candidates using {@link SpringFactoriesLoader} with
* {@link #getSpringFactoriesLoaderFactoryClass()}.
* @param metadata the source metadata
* @param attributes the {@link #getAttributes(AnnotationMetadata) annotation
* attributes}
* @return a list of candidate configurations
*/
protected List<String> getCandidateConfigurations(AnnotationMetadata metadata, AnnotationAttributes attributes) {
//具体在这里可以抽时间细细分析
List<String> configurations = SpringFactoriesLoader.loadFactoryNames(getSpringFactoriesLoaderFactoryClass(),
getBeanClassLoader());
//configurations集合为空的话报异常,在META-INF/spring.factories下面找不到自动装配的类,如果使用的是自定义包装,请确保该文件正确无误。
Assert.notEmpty(configurations, "No auto configuration classes found in META-INF/spring.factories. If you "
+ "are using a custom packaging, make sure that file is correct.");
return configurations;
}

META-INF/spring.factories

1
2
3
4
5
6
7
8
9
10
11
12
13
14
15
16
17
18
19
20
21
22
23
24
25
26
27
28
29
30
31
32
33
34
35
36
37
38
39
40
41
42
43
44
45
46
47
48
49
50
51
52
53
54
55
56
57
58
59
60
61
62
63
64
65
66
67
68
69
70
71
72
73
74
75
76
77
78
79
80
81
82
83
84
85
86
87
88
89
90
91
92
93
94
95
96
97
98
99
100
101
102
103
104
105
106
107
108
109
110
111
112
113
114
115
116
117
118
119
120
121
122
123
124
125
126
127
128
129
130
131
132
133
134
135
136
137
138
139
140
141
142
143
144
145
146
147
148
149
150
151
152
153
154
155
156
157
# Initializers
org.springframework.context.ApplicationContextInitializer=\
org.springframework.boot.autoconfigure.SharedMetadataReaderFactoryContextInitializer,\
org.springframework.boot.autoconfigure.logging.ConditionEvaluationReportLoggingListener

# Application Listeners
org.springframework.context.ApplicationListener=\
org.springframework.boot.autoconfigure.BackgroundPreinitializer

# Auto Configuration Import Listeners
org.springframework.boot.autoconfigure.AutoConfigurationImportListener=\
org.springframework.boot.autoconfigure.condition.ConditionEvaluationReportAutoConfigurationImportListener

# Auto Configuration Import Filters
org.springframework.boot.autoconfigure.AutoConfigurationImportFilter=\
org.springframework.boot.autoconfigure.condition.OnBeanCondition,\
org.springframework.boot.autoconfigure.condition.OnClassCondition,\
org.springframework.boot.autoconfigure.condition.OnWebApplicationCondition

# Auto Configure
org.springframework.boot.autoconfigure.EnableAutoConfiguration=\
org.springframework.boot.autoconfigure.admin.SpringApplicationAdminJmxAutoConfiguration,\
org.springframework.boot.autoconfigure.aop.AopAutoConfiguration,\
org.springframework.boot.autoconfigure.amqp.RabbitAutoConfiguration,\
org.springframework.boot.autoconfigure.batch.BatchAutoConfiguration,\
org.springframework.boot.autoconfigure.cache.CacheAutoConfiguration,\
org.springframework.boot.autoconfigure.cassandra.CassandraAutoConfiguration,\
org.springframework.boot.autoconfigure.cloud.CloudServiceConnectorsAutoConfiguration,\
org.springframework.boot.autoconfigure.context.ConfigurationPropertiesAutoConfiguration,\
org.springframework.boot.autoconfigure.context.MessageSourceAutoConfiguration,\
org.springframework.boot.autoconfigure.context.PropertyPlaceholderAutoConfiguration,\
org.springframework.boot.autoconfigure.couchbase.CouchbaseAutoConfiguration,\
org.springframework.boot.autoconfigure.dao.PersistenceExceptionTranslationAutoConfiguration,\
org.springframework.boot.autoconfigure.data.cassandra.CassandraDataAutoConfiguration,\
org.springframework.boot.autoconfigure.data.cassandra.CassandraReactiveDataAutoConfiguration,\
org.springframework.boot.autoconfigure.data.cassandra.CassandraReactiveRepositoriesAutoConfiguration,\
org.springframework.boot.autoconfigure.data.cassandra.CassandraRepositoriesAutoConfiguration,\
org.springframework.boot.autoconfigure.data.couchbase.CouchbaseDataAutoConfiguration,\
org.springframework.boot.autoconfigure.data.couchbase.CouchbaseReactiveDataAutoConfiguration,\
org.springframework.boot.autoconfigure.data.couchbase.CouchbaseReactiveRepositoriesAutoConfiguration,\
org.springframework.boot.autoconfigure.data.couchbase.CouchbaseRepositoriesAutoConfiguration,\
org.springframework.boot.autoconfigure.data.elasticsearch.ElasticsearchAutoConfiguration,\
org.springframework.boot.autoconfigure.data.elasticsearch.ElasticsearchDataAutoConfiguration,\
org.springframework.boot.autoconfigure.data.elasticsearch.ElasticsearchRepositoriesAutoConfiguration,\
org.springframework.boot.autoconfigure.data.jdbc.JdbcRepositoriesAutoConfiguration,\
org.springframework.boot.autoconfigure.data.jpa.JpaRepositoriesAutoConfiguration,\
org.springframework.boot.autoconfigure.data.ldap.LdapRepositoriesAutoConfiguration,\
org.springframework.boot.autoconfigure.data.mongo.MongoDataAutoConfiguration,\
org.springframework.boot.autoconfigure.data.mongo.MongoReactiveDataAutoConfiguration,\
org.springframework.boot.autoconfigure.data.mongo.MongoReactiveRepositoriesAutoConfiguration,\
org.springframework.boot.autoconfigure.data.mongo.MongoRepositoriesAutoConfiguration,\
org.springframework.boot.autoconfigure.data.neo4j.Neo4jDataAutoConfiguration,\
org.springframework.boot.autoconfigure.data.neo4j.Neo4jRepositoriesAutoConfiguration,\
org.springframework.boot.autoconfigure.data.solr.SolrRepositoriesAutoConfiguration,\
org.springframework.boot.autoconfigure.data.redis.RedisAutoConfiguration,\
org.springframework.boot.autoconfigure.data.redis.RedisReactiveAutoConfiguration,\
org.springframework.boot.autoconfigure.data.redis.RedisRepositoriesAutoConfiguration,\
org.springframework.boot.autoconfigure.data.rest.RepositoryRestMvcAutoConfiguration,\
org.springframework.boot.autoconfigure.data.web.SpringDataWebAutoConfiguration,\
org.springframework.boot.autoconfigure.elasticsearch.jest.JestAutoConfiguration,\
org.springframework.boot.autoconfigure.elasticsearch.rest.RestClientAutoConfiguration,\
org.springframework.boot.autoconfigure.flyway.FlywayAutoConfiguration,\
org.springframework.boot.autoconfigure.freemarker.FreeMarkerAutoConfiguration,\
org.springframework.boot.autoconfigure.gson.GsonAutoConfiguration,\
org.springframework.boot.autoconfigure.h2.H2ConsoleAutoConfiguration,\
org.springframework.boot.autoconfigure.hateoas.HypermediaAutoConfiguration,\
org.springframework.boot.autoconfigure.hazelcast.HazelcastAutoConfiguration,\
org.springframework.boot.autoconfigure.hazelcast.HazelcastJpaDependencyAutoConfiguration,\
org.springframework.boot.autoconfigure.http.HttpMessageConvertersAutoConfiguration,\
org.springframework.boot.autoconfigure.http.codec.CodecsAutoConfiguration,\
org.springframework.boot.autoconfigure.influx.InfluxDbAutoConfiguration,\
org.springframework.boot.autoconfigure.info.ProjectInfoAutoConfiguration,\
org.springframework.boot.autoconfigure.integration.IntegrationAutoConfiguration,\
org.springframework.boot.autoconfigure.jackson.JacksonAutoConfiguration,\
org.springframework.boot.autoconfigure.jdbc.DataSourceAutoConfiguration,\
org.springframework.boot.autoconfigure.jdbc.JdbcTemplateAutoConfiguration,\
org.springframework.boot.autoconfigure.jdbc.JndiDataSourceAutoConfiguration,\
org.springframework.boot.autoconfigure.jdbc.XADataSourceAutoConfiguration,\
org.springframework.boot.autoconfigure.jdbc.DataSourceTransactionManagerAutoConfiguration,\
org.springframework.boot.autoconfigure.jms.JmsAutoConfiguration,\
org.springframework.boot.autoconfigure.jmx.JmxAutoConfiguration,\
org.springframework.boot.autoconfigure.jms.JndiConnectionFactoryAutoConfiguration,\
org.springframework.boot.autoconfigure.jms.activemq.ActiveMQAutoConfiguration,\
org.springframework.boot.autoconfigure.jms.artemis.ArtemisAutoConfiguration,\
org.springframework.boot.autoconfigure.groovy.template.GroovyTemplateAutoConfiguration,\
org.springframework.boot.autoconfigure.jersey.JerseyAutoConfiguration,\
org.springframework.boot.autoconfigure.jooq.JooqAutoConfiguration,\
org.springframework.boot.autoconfigure.jsonb.JsonbAutoConfiguration,\
org.springframework.boot.autoconfigure.kafka.KafkaAutoConfiguration,\
org.springframework.boot.autoconfigure.ldap.embedded.EmbeddedLdapAutoConfiguration,\
org.springframework.boot.autoconfigure.ldap.LdapAutoConfiguration,\
org.springframework.boot.autoconfigure.liquibase.LiquibaseAutoConfiguration,\
org.springframework.boot.autoconfigure.mail.MailSenderAutoConfiguration,\
org.springframework.boot.autoconfigure.mail.MailSenderValidatorAutoConfiguration,\
org.springframework.boot.autoconfigure.mongo.embedded.EmbeddedMongoAutoConfiguration,\
org.springframework.boot.autoconfigure.mongo.MongoAutoConfiguration,\
org.springframework.boot.autoconfigure.mongo.MongoReactiveAutoConfiguration,\
org.springframework.boot.autoconfigure.mustache.MustacheAutoConfiguration,\
org.springframework.boot.autoconfigure.orm.jpa.HibernateJpaAutoConfiguration,\
org.springframework.boot.autoconfigure.quartz.QuartzAutoConfiguration,\
org.springframework.boot.autoconfigure.reactor.core.ReactorCoreAutoConfiguration,\
org.springframework.boot.autoconfigure.security.servlet.SecurityAutoConfiguration,\
org.springframework.boot.autoconfigure.security.servlet.UserDetailsServiceAutoConfiguration,\
org.springframework.boot.autoconfigure.security.servlet.SecurityFilterAutoConfiguration,\
org.springframework.boot.autoconfigure.security.reactive.ReactiveSecurityAutoConfiguration,\
org.springframework.boot.autoconfigure.security.reactive.ReactiveUserDetailsServiceAutoConfiguration,\
org.springframework.boot.autoconfigure.sendgrid.SendGridAutoConfiguration,\
org.springframework.boot.autoconfigure.session.SessionAutoConfiguration,\
org.springframework.boot.autoconfigure.security.oauth2.client.servlet.OAuth2ClientAutoConfiguration,\
org.springframework.boot.autoconfigure.security.oauth2.client.reactive.ReactiveOAuth2ClientAutoConfiguration,\
org.springframework.boot.autoconfigure.security.oauth2.resource.servlet.OAuth2ResourceServerAutoConfiguration,\
org.springframework.boot.autoconfigure.security.oauth2.resource.reactive.ReactiveOAuth2ResourceServerAutoConfiguration,\
org.springframework.boot.autoconfigure.solr.SolrAutoConfiguration,\
org.springframework.boot.autoconfigure.task.TaskExecutionAutoConfiguration,\
org.springframework.boot.autoconfigure.task.TaskSchedulingAutoConfiguration,\
org.springframework.boot.autoconfigure.thymeleaf.ThymeleafAutoConfiguration,\
# spring事物的自动装配,SpringApplication项目启动的时候会自动装配,需要使用事物的地方只要添加上@TransAction注解即可开启事物
org.springframework.boot.autoconfigure.transaction.TransactionAutoConfiguration,\
org.springframework.boot.autoconfigure.transaction.jta.JtaAutoConfiguration,\
org.springframework.boot.autoconfigure.validation.ValidationAutoConfiguration,\
org.springframework.boot.autoconfigure.web.client.RestTemplateAutoConfiguration,\
#springboot内置Tomcat容器
org.springframework.boot.autoconfigure.web.embedded.EmbeddedWebServerFactoryCustomizerAutoConfiguration,\
org.springframework.boot.autoconfigure.web.reactive.HttpHandlerAutoConfiguration,\
org.springframework.boot.autoconfigure.web.reactive.ReactiveWebServerFactoryAutoConfiguration,\
org.springframework.boot.autoconfigure.web.reactive.WebFluxAutoConfiguration,\
org.springframework.boot.autoconfigure.web.reactive.error.ErrorWebFluxAutoConfiguration,\
org.springframework.boot.autoconfigure.web.reactive.function.client.ClientHttpConnectorAutoConfiguration,\
org.springframework.boot.autoconfigure.web.reactive.function.client.WebClientAutoConfiguration,\
org.springframework.boot.autoconfigure.web.servlet.DispatcherServletAutoConfiguration,\
//内置的Tomcat在这里被启动(org.apache.catalina.startup.Tomcat)
org.springframework.boot.autoconfigure.web.servlet.ServletWebServerFactoryAutoConfiguration,\
org.springframework.boot.autoconfigure.web.servlet.error.ErrorMvcAutoConfiguration,\
org.springframework.boot.autoconfigure.web.servlet.HttpEncodingAutoConfiguration,\
org.springframework.boot.autoconfigure.web.servlet.MultipartAutoConfiguration,\
//springMvc的自动装配配置
org.springframework.boot.autoconfigure.web.servlet.WebMvcAutoConfiguration,\
org.springframework.boot.autoconfigure.websocket.reactive.WebSocketReactiveAutoConfiguration,\
org.springframework.boot.autoconfigure.websocket.servlet.WebSocketServletAutoConfiguration,\
org.springframework.boot.autoconfigure.websocket.servlet.WebSocketMessagingAutoConfiguration,\
org.springframework.boot.autoconfigure.webservices.WebServicesAutoConfiguration,\
org.springframework.boot.autoconfigure.webservices.client.WebServiceTemplateAutoConfiguration

# Failure analyzers
org.springframework.boot.diagnostics.FailureAnalyzer=\
org.springframework.boot.autoconfigure.diagnostics.analyzer.NoSuchBeanDefinitionFailureAnalyzer,\
org.springframework.boot.autoconfigure.jdbc.DataSourceBeanCreationFailureAnalyzer,\
org.springframework.boot.autoconfigure.jdbc.HikariDriverConfigurationFailureAnalyzer,\
org.springframework.boot.autoconfigure.session.NonUniqueSessionRepositoryFailureAnalyzer

# Template availability providers
org.springframework.boot.autoconfigure.template.TemplateAvailabilityProvider=\
org.springframework.boot.autoconfigure.freemarker.FreeMarkerTemplateAvailabilityProvider,\
org.springframework.boot.autoconfigure.mustache.MustacheTemplateAvailabilityProvider,\
org.springframework.boot.autoconfigure.groovy.template.GroovyTemplateAvailabilityProvider,\
org.springframework.boot.autoconfigure.thymeleaf.ThymeleafTemplateAvailabilityProvider,\
org.springframework.boot.autoconfigure.web.servlet.JspTemplateAvailabilityProvider

EmbeddedWebServerFactoryCustomizerAutoConfiguration.class

1
2
3
4
5
6
7
8
9
10
11
12
13
14
/**
* Nested configuration if Tomcat is being used.
*/
@Configuration
@ConditionalOnClass({ Tomcat.class, UpgradeProtocol.class })
public static class TomcatWebServerFactoryCustomizerConfiguration {

@Bean
public TomcatWebServerFactoryCustomizer tomcatWebServerFactoryCustomizer(Environment environment,
ServerProperties serverProperties) {
return new TomcatWebServerFactoryCustomizer(environment, serverProperties);
}

}

Future接口的局限性

我们知道Future接口提供了方法来检测异步计算是否已经结束(使用isDone方法),等待异步操作结束,以及获取计算的结果。
但是这些特性还不足以让你编写简洁的并发代码。
我们很难表述Future结果之间的依赖性;从文字描述上这很简单,“当长时间计算任务完成时,请将该计算的结果通知到另一个长时间运行的计算任务,这两个计算任务都完成后,将计算的结果与另一个查询操作结果合并”。
使用Future中提供的方法完成这样的操作又是另外一回事。这也是我们需要更具描述能力的特性的原因,比如下面这些。

  • 将两个异步计算合并为一个——这两个异步计算之间相互独立,同时第二个又依赖于第一个的结果。
  • 等待Future集合中的所有任务都完成。
  • 仅等待Future集合中最快结束的任务完成(有可能因为它们试图通过不同的方式计算同一个值),并返回它的结果。
  • 通过编程方式完成一个Future任务的执行(即以手工设定异步操作结果的方式)。
  • 应对Future的完成事件(即当Future的完成事件发生时会收到通知,并能使用Future计算的结果进行下一步的操作,不只是简单地阻塞等待操作的结果)。

店铺实体类

1
2
3
4
5
6
7
8
9
10
11
12
13
14
15
16
17
18
19
20
21
22
23
24
25
26
27
28
29
30
31
32
33
34
35
36
37
38
39
40
41
42
43
44
45
46
47
48
49
50
51
package world.ismyfree.async.demo01;

import java.util.Random;
import java.util.concurrent.CompletableFuture;
import java.util.concurrent.Future;

/**
* @author :tanliyuan
* @date :Created in 2020/6/4 21:27
* @description :商店实体
* @version: 1.0
*/
public class Shop {
private Random random = new Random();
private String shopName;

public void setShopName(String shopName) {
this.shopName = shopName;
}

public String getShopName() {
return shopName;
}


public Shop(String shopName) {
this.shopName = shopName;
}


public double getPrice(String product) {
return calculatePrice(product);
}

public Future<Double> getPriceAsync(String product) {
return CompletableFuture.supplyAsync(() -> calculatePrice(product));
}

private double calculatePrice(String product) {
delay();
return random.nextDouble() * product.charAt(0) + product.charAt(1);
}

public static void delay() {
try {
Thread.sleep(1000L);
} catch (InterruptedException e) {
throw new RuntimeException(e);
}
}
}

店铺测试代码

1
2
3
4
5
6
7
8
9
10
11
12
13
14
15
16
17
18
19
20
21
22
23
24
25
26
27
28
29
30
31
32
33
34
35
36
37
38
39
40
41
42
43
44
45
46
47
48
49
50
51
52
53
54
55
56
57
58
59
60
61
62
63
64
65
66
67
68
69
70
71
72
73
74
75
76
77
78
79
80
81
82
83
84
85
86
87
88
89
90
91
92
93
94
package world.ismyfree.async.demo01;

import java.util.Arrays;
import java.util.List;
import java.util.concurrent.CompletableFuture;
import java.util.concurrent.Executor;
import java.util.concurrent.Executors;
import java.util.concurrent.ThreadFactory;
import java.util.stream.Collectors;

/**
* @author :tanliyuan
* @date :Created in 2020/6/5 10:32
* @description
* @version: 1.0
*/
public class ShopTest {
/**
* 商店列表
*/
public static List<Shop> shops = Arrays.asList(
new Shop("BestShop"),
new Shop("MyShop"),
new Shop("YourShop"),
new Shop("SuperShop")
);
/**
* 定制多线程执行器
*/
private static Executor executor = Executors.newFixedThreadPool(Math.min(shops.size(), 100), new ThreadFactory() {
@Override
public Thread newThread(Runnable r) {
Thread t = new Thread(r);
t.setDaemon(true);
return t;
}
});
/**
* CompletableFuture版本获取价格
*
* @param product
* @return
*/
private static List<String> getPricesCompletetableFuture(String product) {
List<CompletableFuture<String>> pricesFuture = shops.stream().map(
s -> CompletableFuture.supplyAsync(
() -> String.format("%s在%s的价格是%s", product, s.getShopName(), s.getPrice(product)),
executor
)
).collect(Collectors.toList());
System.out.println("异步对象已经返回,等待耗时任务计算完成");
return pricesFuture.stream().map(CompletableFuture::join).collect(Collectors.toList());
}
/**
* 使用顺序流获取商品的价格
*
* @param product
* @return
*/
private List<String> getPricesStream(String product) {
return shops.stream().map(s -> {
return s.getShopName() + "的价格是" + s.getPrice(product);
}).collect(Collectors.toList());
}
/**
* 使用并发流获取商品的价格
*
* @param product
* @return
*/
private List<String> getPricesParallelStream(String product) {
return shops.parallelStream().map(s -> {
return s.getShopName() + "的价格是" + s.getPrice(product);
}).collect(Collectors.toList());
}
/**
* 做一些有意义的事情
*/
private static void doSomething() {
System.out.println("做一些其他有意义的事");
}

public static void main(String[] args) {
long start = System.currentTimeMillis();
//System.out.println(getPricesStream("Apples"));
//System.out.println(getPricesParallelStream("Apples"));
System.out.println(getPricesCompletetableFuture("Apples"));
long invocationTime = System.currentTimeMillis() - start;
System.out.printf("异步对象返回时间%d毫秒%n", invocationTime);
doSomething();
long retrievalTime = System.currentTimeMillis() - start;
System.out.printf("计算结果返回时间%d毫秒%n", retrievalTime);
}
}

持续更新中》》》》》

容器生命周期管理

run

docker run :创建一个新的容器并运行一个命令

语法

1
docker run [OPTIONS] IMAGE [COMMAND] [ARG...]

OPTIONS说明:

  • -a stdin: 指定标准输入输出内容类型,可选 STDIN/STDOUT/STDERR 三项;

  • -d: 后台运行容器,并返回容器ID;

  • -i: 以交互模式运行容器,通常与 -t 同时使用;

  • -P: 随机端口映射,容器内部端口随机映射到主机的高端口;

  • -t: 为容器重新分配一个伪输入终端,通常与 -i 同时使用;

  • –name=”nginx-lb”: 为容器指定一个名称;

  • –dns 8.8.8.8: 指定容器使用的DNS服务器,默认和宿主一致;

  • –dns-search example.com: 指定容器DNS搜索域名,默认和宿主一致;

  • -h “mars”: 指定容器的hostname;

  • -e username=”ritchie”: 设置环境变量;

  • –env-file=[]: 从指定文件读入环境变量;

  • –cpuset=”0-2” or –cpuset=”0,1,2”: 绑定容器到指定CPU运行;

  • -m :设置容器使用内存最大值;

  • –net=”bridge”: 指定容器的网络连接类型,支持 bridge/host/none/container: 四种类型;

  • –link=[]: 添加链接到另一个容器;

  • –expose=[]: 开放一个端口或一组端口;

  • –volume , -v: 绑定一个卷;

实例

使用docker镜像nginx:latest以后台模式启动一个容器,并将容器命名为mynginx。

1
docker run --name mynginx -d nginx:latest

使用镜像nginx:latest以后台模式启动一个容器,并将容器的80端口映射到主机随机端口。

1
docker run -P -d nginx:latest

使用镜像 nginx:latest,以后台模式启动一个容器,将容器的 80 端口映射到主机的 80 端口,主机的目录 /data 映射到容器的 /data。

1
docker run -p 80:80 -v /data:/data -d nginx:latest

绑定容器的 8080 端口,并将其映射到本地主机 127.0.0.1 的 80 端口上。

1
docker run -p 127.0.0.1:80:8080/tcp ubuntu bash

使用镜像nginx:latest以交互模式启动一个容器,在容器内执行/bin/bash命令。

1
docker run -it nginx:latest /bin/bash

start/stop/restart

docker start :启动一个或多个已经被停止的容器

docker stop :停止一个运行中的容器

docker restart :重启容器

语法

1
docker run [OPTIONS] IMAGE [COMMAND] [ARG...]

OPTIONS说明:

  • -a stdin: 指定标准输入输出内容类型,可选 STDIN/STDOUT/STDERR 三项;

  • -d: 后台运行容器,并返回容器ID;

  • -d: 后台运行容器,并返回容器ID;

  • -i: 以交互模式运行容器,通常与 -t 同时使用;

  • -P: 随机端口映射,容器内部端口随机映射到主机的高端口

  • -p: 指定端口映射,格式为:主机(宿主)端口:容器端口

  • -t: 为容器重新分配一个伪输入终端,通常与 -i 同时使用;

  • –name=”nginx-lb”: 为容器指定一个名称;

  • –dns 8.8.8.8: 指定容器使用的DNS服务器,默认和宿主一致;

  • –dns-search example.com: 指定容器DNS搜索域名,默认和宿主一致;

  • -h “mars”: 指定容器的hostname;

  • –env-file=[]: 从指定文件读入环境变量;

  • –cpuset=”0-2” or –cpuset=”0,1,2”: 绑定容器到指定CPU运行;

  • -m :设置容器使用内存最大值;

  • –net=”bridge”: 指定容器的网络连接类型,支持 bridge/host/none/container: 四种类型;

  • –link=[]: 添加链接到另一个容器;

  • –expose=[]: 开放一个端口或一组端口;

  • –volume , -v: 绑定一个卷;

实例

使用docker镜像nginx:latest以后台模式启动一个容器,并将容器命名为mynginx。

1
docker run --name mynginx -d nginx:latest

使用镜像nginx:latest以后台模式启动一个容器,并将容器的80端口映射到主机随机端口。

1
docker run -P -d nginx:latest

使用镜像 nginx:latest,以后台模式启动一个容器,将容器的 80 端口映射到主机的 80 端口,主机的目录 /data 映射到容器的 /data。

1
docker run -p 80:80 -v /data:/data -d nginx:latest

绑定容器的 8080 端口,并将其映射到本地主机 127.0.0.1 的 80 端口上。

1
docker run -p 127.0.0.1:80:8080/tcp ubuntu bash

使用镜像nginx:latest以交互模式启动一个容器,在容器内执行/bin/bash命令。

1
docker run -it nginx:latest /bin/bash

kill

docker kill :杀掉一个运行中的容器。

语法

1
docker kill [OPTIONS] CONTAINER [CONTAINER...]

OPTIONS说明:

  • -s :向容器发送一个信号;

实例

杀掉运行中的容器mynginx

1
docker kill -s KILL mynginx

pause/unpause

docker pause :暂停容器中所有的进程。

docker unpause :恢复容器中所有的进程。

语法

1
docker pause [OPTIONS] CONTAINER [CONTAINER...]
1
docker unpause [OPTIONS] CONTAINER [CONTAINER...]

实例

暂停数据库容器db01提供服务。

1
docker pause db01

恢复数据库容器db01提供服务。

1
docker unpause db01

create

docker create :创建一个新的容器但不启动它

OPTIONS说明:

  • -a stdin: 指定标准输入输出内容类型,可选 STDIN/STDOUT/STDERR 三项;

  • -d: 后台运行容器,并返回容器ID;

  • -i: 以交互模式运行容器,通常与 -t 同时使用;

  • -P: 随机端口映射,容器内部端口随机映射到主机的高端口

  • -p: 指定端口映射,格式为:主机(宿主)端口:容器端口

  • -t: 为容器重新分配一个伪输入终端,通常与 -i 同时使用;

  • –name=”nginx-lb”: 为容器指定一个名称;

  • –dns 8.8.8.8: 指定容器使用的DNS服务器,默认和宿主一致;

  • –dns-search example.com: 指定容器DNS搜索域名,默认和宿主一致;

  • -h “mars”: 指定容器的hostname;

  • -e username=”ritchie”: 设置环境变量;

  • –env-file=[]: 从指定文件读入环境变量;

  • –cpuset=”0-2” or –cpuset=”0,1,2”: 绑定容器到指定CPU运行;

  • -m :设置容器使用内存最大值;

  • –net=”bridge”: 指定容器的网络连接类型,支持 bridge/host/none/container: 四种类型;

  • –link=[]: 添加链接到另一个容器;

  • –expose=[]: 开放一个端口或一组端口;

  • –volume , -v: 绑定一个卷 ;

语法

1
docker create [OPTIONS] IMAGE [COMMAND] [ARG...]

实例

使用docker镜像nginx:latest创建一个容器,并将容器命名为myrunoob。

1
docker create --name myrunoob nginx:latest

exec

docker exec :在运行的容器中执行命令

语法

1
docker exec [OPTIONS] CONTAINER COMMAND [ARG...]

OPTIONS说明:

  • -d :分离模式: 在后台运行

  • -i :即使没有附加也保持STDIN 打开

  • -t :分配一个伪终端

实例

在容器 mynginx 中以交互模式执行容器内 /root/runoob.sh 脚本:

1
docker exec -it mynginx /bin/sh /root/runoob.sh

在容器 mynginx 中开启一个交互模式的终端:

1
docker exec -i -t  mynginx /bin/bash

也可以通过 docker ps -a 命令查看已经在运行的容器,然后使用容器 ID 进入容器。

1
docker ps -a
1
2
3
...
9df70f9a0714 openjdk "/usercode/script.sh…"
...
1
docker exec -it 9df70f9a0714 /bin/bash

容器操作

ps

inspect

top

attach

events

logs

wait

export

port

容器rootfs命令

commit

cp

diff

镜像仓库

login

pull

push

本地镜像管理

images

rmi

tag

build

history

save

load

import

info/version

info

version

持续更新中》》》》》

使当前用户成为root身份

1
sudo su

检查当前运行的Linux内核的版本

1
uname -a

查看看我们系统正在使用的内核版本

检查Ubuntu版本

1
cat /etc/lsb-release

该命令显示Ubuntu版本是18.04

安装软件之前更新Ubuntu

1
2
sudo apt-get update
sudo apt-get upgrade

从Ubuntu存储库安装Docker

1
sudo apt install docker.io

启动Docker并使用systemctl命令将其添加到引导时间

1
2
systemctl start docker
systemctl enable docker

检查Docker版本

1
docker --version

到这就安装完成了,你可以尽情玩你的docker了,嘻嘻!!!