nginx默认配置文件 1 2 3 4 5 6 7 8 9 10 11 12 13 14 15 16 17 18 19 20 21 22 23 24 25 26 27 28 29 30 31 32 33 34 35 36 37 38 39 40 41 42 43 44 45 46 47 48 49 50 51 52 53 54 55 56 57 58 59 60 61 62 63 64 65 66 67 68 69 70 71 72 73 74 75 76 77 78 79 80 81 82 83 84 85 86 87 88 89 90 91 92 93 94 95 96 97 98 99 100 101 102 103 104 105 106 107 108 109 110 111 112 113 114 115 116 117 118 119 120 121 122 123 124 125 126 127 128 129 130 131 132 133 134 135 136 137 138 139 140 141 142 143 144 145 146 147 148 149 150 151 152 153 154 155 156 157 158 159 160 161 162 163 164 165 166 167 168 169 170 171 172 173 174 175 176 177 178 179 180 181 182 183 184 185 186 #user可以配置文件目录访问的用户 #user nobody; # worker_processes可以指定工作进程的数量 worker_processes 1; #error_log logs/error.log; #error_log logs/error.log notice; #error_log logs/error.log info; #pid logs/nginx.pid; #事件处理 events { use epoll; #默认使用epoll worker_connections 1024; #每个worker工作进程允许连接客户端的最大连接数(可以配置) #nginx之所以能处理高并发就是因为这里及nginx的事件处理模型 } http { #include包含导入外部文件(mime.types在config目录下,包含了平时请求包含的类型),提高可读性 #我们自己通过include导入server配置也是没有问题的(导入配置一定要记得加分号) include mime.types; #默认的type类型 default_type application/octet-stream; #日志格式的配置(默认自带日志格式不需要配置/如果需要定制化日志格式可以对其进行配置) #log_format main '$remote_addr - $remote_user [$time_local] "$request" ' # '$status $body_bytes_sent "$http_referer" ' # '"$http_user_agent" "$http_x_forwarded_for"'; #http请求日志路径,同时代表我们nginx的性能也得到了提升 #access_log logs/access.log main; #打开sendfile可开启文件的高效传输 sendfile on; #开启sendfile才可以开启tcp_nopush,表示数据包累积到一定大小过后再开始发送,提升文件传输的效率(类比外卖小哥打包送餐放到集装箱提高工作效率)/不开启则使用同步阻塞的方式,效率是极其低下的。 #tcp_nopush on; #keepalive_timeout客户端连接服务器的超时时间(以秒为单位),每个客户端连接服务器可以保持连接的时间 #keepalive_timeout 0; keepalive_timeout 65; #内容传输进行压缩,节约服务器带宽的开销,不过压缩肯定会消耗服务器的性能 #gzip on; #限制最小压缩,文件内容小于1个字节就不会对其进行压缩 #gzip_min_length 1; #定义压缩的级别(压缩比,文件越大,压缩越多,但是cpu消耗就更多) #gzip_min_lenght 3; #定义压缩文件的类型 #gzip_types text/plain application/javascript application/x-javascript text/css application/xml text/javascript application/x-httpd-php image/jpeg image/gif image/png application/json #为虚拟主机配置监听信息(可以配置多块) server { #监听的端口号 listen 80; #服务器名称(可以是备案过后域名或ip或者是localhost) server_name localhost; #charset koi8-r; #access_log logs/host.access.log main; #路由,找到对应的页面 location / { #资源路径(可以是绝对路径也可以是相对路径,这里是相对路径) root html; #根路径默认访问的资源 index index.html index.htm; } #错误页面展示 #error_page 404 /404.html; #发生50x错误的时候重定向到相关错误页面 # redirect server error pages to the static page /50x.html # error_page 500 502 503 504 /50x.html; location = /50x.html { root html; } # proxy the PHP scripts to Apache listening on 127.0.0.1:80 # #location ~ \.php$ { # proxy_pass http://127.0.0.1; #} # pass the PHP scripts to FastCGI server listening on 127.0.0.1:9000 # #location ~ \.php$ { # root html; # fastcgi_pass 127.0.0.1:9000; # fastcgi_index index.php; # fastcgi_param SCRIPT_FILENAME /scripts$fastcgi_script_name; # include fastcgi_params; #} # deny access to .htaccess files, if Apache's document root # concurs with nginx's one # #location ~ /\.ht { # deny all; #} #以上配置多个资源路径 #以别名形式配置路径(隐藏真实资源路径) #location /resource { # #将资源路径resource映射到/xxx/xxx/xxx/resource路径下 # alias /xxx/xxx/xxx/resource; #} } #配置上游服务器 upstream tomcats { #默认使用轮询策略,添加weight根据权重选择执行的机器 server 192.168.1.101:8080 weight=1; server 192.168.1.102:8080; server 192.168.1.103:8080; } # another virtual host using mix of IP-, name-, and port-based configuration # #server { # listen 8000; # listen somename:8080; # server_name somename alias another.alias; #允许跨域请求的域,*代表所有 # add_header 'Access-Control-Allow-Origin' *; #允许带上cookie请求 # add_header 'Access-Control-Allow-Credentials' 'true'; #允许请求的方法get/post/put/delete # add_header 'Access-Control-Allow-Method' *; #允许请求的header # add_header 'Access-Control-Allow-Header' *; #对源站点验证(静态资源防盗链) #valid_referers *.xxx.com; #if($invalid_refer) { # return 404; #} # add_header 'Access-Control-Allow-Header' *; # location / { # root html; # index index.html index.htm; # #静态资源访问缓存过期时间,文件发生更改也会不使用缓存。 # expires 10s; # #指定缓存过期时间为22点30分 # expires @22h30m # #缓存在1个小时之前已经过期 # expires -1h # #不设置缓存 # expires epoch # #关闭nginx缓存(默认),浏览器还是有缓存机制 # expires off # #最大过期时间(相当于永不过期) # expires max # } #} # HTTPS server # #server { # listen 443 ssl; # server_name localhost; # ssl_certificate cert.pem; # ssl_certificate_key cert.key; # ssl_session_cache shared:SSL:1m; # ssl_session_timeout 5m; # ssl_ciphers HIGH:!aNULL:!MD5; # ssl_prefer_server_ciphers on; # location / { # root html; # index index.html index.htm; # } #} }
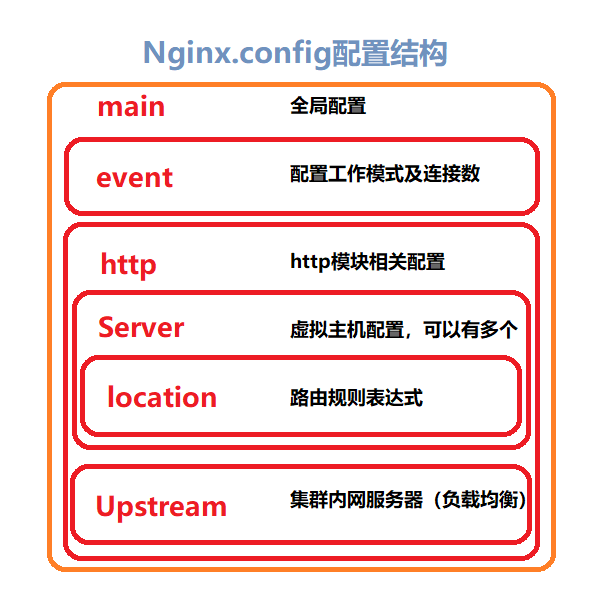
nginx配置结构
校验nginx配置文件是否正确 修改配置文件过后需要重新装载nginx
Nginx进程模型 查看nginx进程
1
2
3
root 4640 1 0 13:59 ? 00:00:00 nginx: master process ./nginx nobody 4641 4640 0 13:59 ? 00:00:00 nginx: worker process root 4723 4668 0 15:22 pts/0 00:00:00 grep --color=auto nginx
根据命令执行结果我们可以看到一共是有两个nginx的进程,第1个是nginx:master主进程,第2个是nginx:worker工作进程,实际上我们是可以通过配置文件指定nginx:worker的工作进程的数量的,配置文件属性如下。
1 worker_processes 1; #指定工作进程的数量
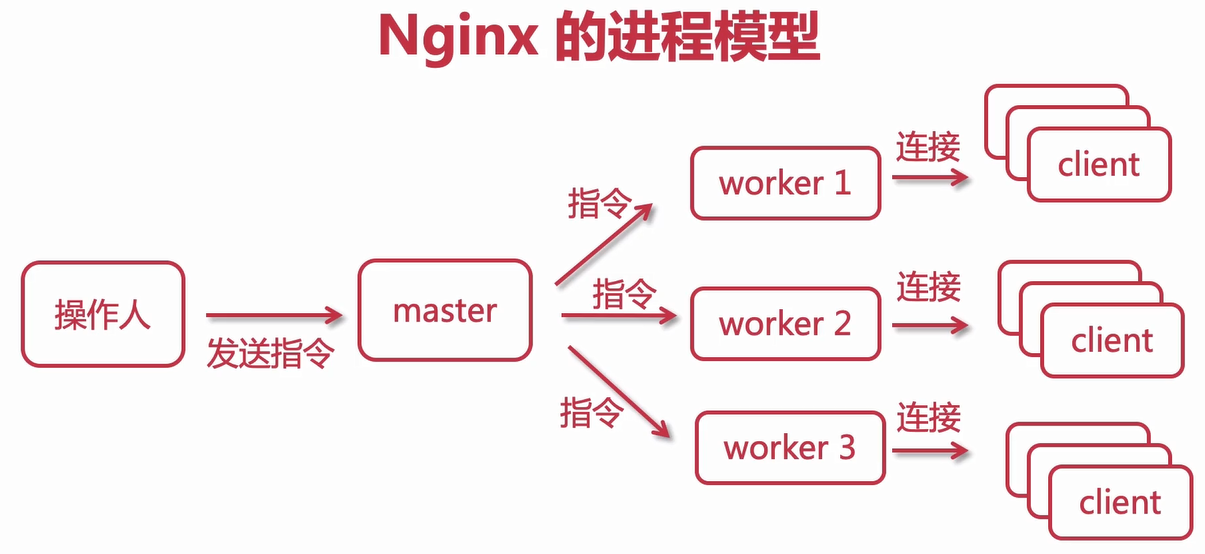
nginx进程模型
nginx:master进程是主进程,对nginx:worker进程进行管理
nginx:worker进程是工作进程,为nginx:master进程服务
nginx:master会发送信号给nginx:worker进程,实例信号指令如下
1
2
3
4
./nginx -s stop ./nginx -s quit ./nginx -s reload ./nginx -t
//todo多看看nginx的进程模型及nginx抢占机制这块知识
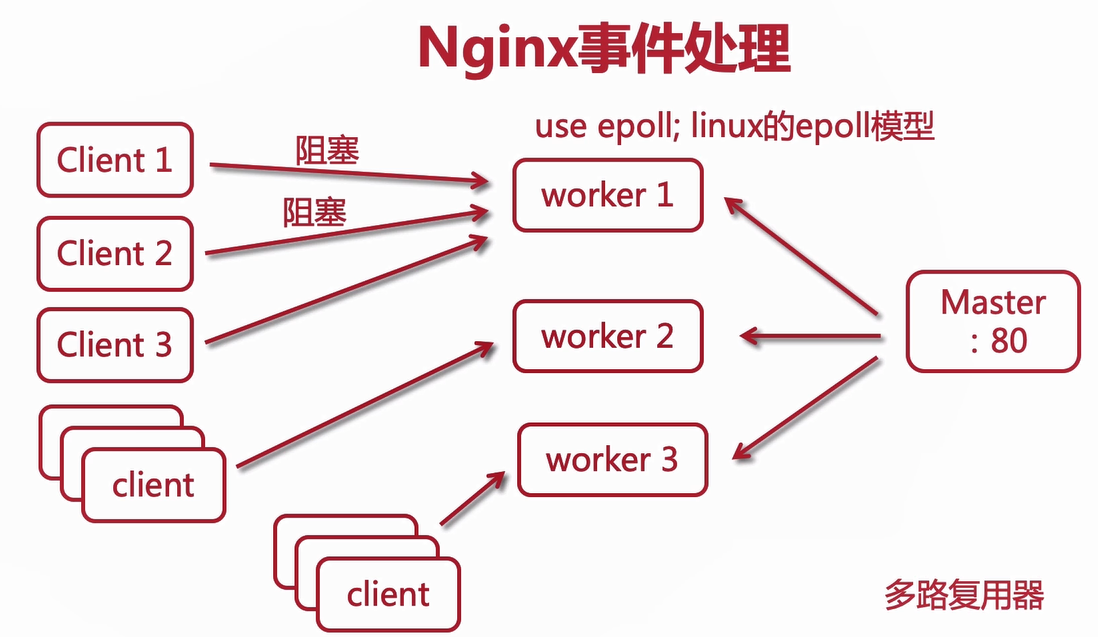
nginx事件处理模型
nginx常见的问题 open “/XXX/XXX/nginx.pid” failed (2: No such file or directory)
如果提示cd: /XXX/XXX:没有哪个文件或目录,创建目录
nginx:[error] invalid PID number “” “in /xxx/xxx/nginx.pid”
1
2
3
4
5
6
7
8
9
10
11
12
13
14
15
16
17
18
Options: //-c查看帮助 -?,-h : this help //查看版本 -v : show version and exit //版本及具体编译安装环境配置参数 -V : show version and configure options then exit //校验配置文件是否正确 -t : test configuration and exit -T : test configuration, dump it and exit -q : suppress non-error messages during configuration testing //发送信号给nginx:master进程,stop停止/quit优雅停止/reopen重新打开/reload重新装载 -s signal : send signal to a master process: stop, quit, reopen, reload //nginx安装路径 -p prefix : set prefix path (default: /usr/local/nginx/) //-c指定配置文件路径 -c filename : set configuration file (default: conf/nginx.conf) -g directives : set global directives out of configuration file
1 ./nginx -c /.../conf/nginx.conf
nginx日志切割
随着时间的推移项目日志越大,达到10GB甚至几十GB,不便于日志分析,我们需要对日志进行切割
手动切割日志的脚本
创建一个可执行的shell脚本:cut_my_log.sh,内容如下:
1
2
3
4
5
6
7
8
#!/bin/bash LOG_PATH="/var/log/nginx" RECORD_TIME=$(date -d "yesterday" +%Y-%m-%d+%H:%M) PID=/var/run/nginx/nginx.pid mv ${LOG_PATH}/access.log ${LOG_PATH}/access.${RECORD_TIME}.log mv ${LOG_PATH}/error.log ${LOG_PATH}/access.${RECORD_TIME}.log #向nginx:master进程发送信号,用于重新打开日志文件 kill -USR1 `cat $PID`
nginx匹配规则
location / #路径存在即可访问
location = / #精确匹配 (这里只能访问到根)
location ~ .(GIF|png|bmp|jpg|jpeg) #正则表达式不带*区分大小写
location ~* .(GIF|png|bmp|jpg|jpeg) #正则表达式带*不区分大小写
location ^~ /xxx/xxx #不使用正则表达式以/xxx/xxx路径开头
upstream指令参数
upstream指定参数以key与value的形式配置到ip及端口的后面如下所示
1
2
3
upstream tomcats { server 192.168.1.101:8080 key=value; }
指令参数 max_conns=count (根据服务器性能设置过载保护做限流现作用,每个工作进程都能生效,在1.11.5之前这个参数只适用于商业版本) slow_start=time(服务器恢复过后经过time的时间过后再加入到upstream集群中,商业版nginx中才能使用) down 配置该服务器在集群中标记为不可用状态 back 标记该服务是一台备用机,集群中其它服务器不可用的时候会启动该台服务器进行备用 max_fails=count最大失败次数 fail_time_out=time 以上两个参数连用表示time时间内失败次数超过count就会将服务踢出upstream集群中,15s后再尝试请求是否正常如此往复 keepalive=count提高吞吐量 1 2 3 4 5 6 7 8 9 10 11 12 13 14 15 16 upstream tomcats { server 192.168.1.101:8080; #保持长连接的数量 keepalive 32; } server { listen 80; server_name www.tomcats.com; location / { proxy_pass http://tomcats; #协议版本号http1.1才支持保持长连接避免服务经常创建关闭消耗服务器资源 proxy_http_version 1.1; #清除collection中的信息 proxy_set_header Connection ""; } }
ip_hash ip地址取模请求打到固定的服务器上面
配置方式如下即可
不同ip的客户端会会固定的请求到不同的固定服务器
1
2
3
4
5
6
7
upstream tomcats { #ip_hash根据请求的ip地址与集群中服务器的数量进行求模操作 ip_hash; server 192.168.1.101:8080; server 192.168.1.102:8080; server 192.168.1.103:8080; }
ip_hash在nginx源码中的算法
ip_hash源码在安装包内/src/http/modules/ngx_http_upstream_ip_hash_module.c文件中
源码中通过”.”对ip进行切割的数组长度为4,索引为0~3,取索引2进行取模,所以在本地内网环境访问服务器的时候看不出来不同的ip打到了相同的服务器
ip_hash注意 使用ip_hash的时候如果其中一台服务器出现了问题我们需要移除不能在upstrem中直接删除,否则hash的值会发生改变,请求的服务器就会发生改变,我们应该将服务器标记为down不被请求。
ip_hash带来的问题
如果服务器数量发生变化,无论是新增或者减少都会导致hash算法算出来的值发生变化,会话丢失,缓存无法访问等问题。
一致性哈希算法
一致性哈希算法是将用户哈希到这个环上,相同的用户在访问的主机不会发生变化,只有当主机节点数量发生变化的时候才会有少量的用户主机请求的服务器发生变化,保证大部分用户请求的主机不会发生变化。
原有的服务器及用户状态
服务器数量减少
图中节点3移除了,原有访问节点3的2个少量用户转移到了节点4,其余节点上的用户访问的服务器不发生变化
假如说要增加服务器
图中我们看出服务器数量增加只有一个用户变更了服务器的请求地址,其余用户不发生改变。
Nginx负载均衡算法有哪些
nginx默认使用轮询算法。
ip_hash根据请求客户端的ip进行哈希请求到固定的服务器。
url_hash根据url地址进行hash请求到固定的服务器。
least_conn哪台服务器的连接数少就连接到哪一台服务器
配置nginx静态资源文件缓存过期时间
1
2
3
4
5
6
7
8
9
10
11
proxy_cache_path /usr/local/nginx/upstream_cache keys_zone=mycache:5m max_size=1g inactive=30s use_temp_path=off; server { listen 80; server_name www.tomcats.com; #静态资源开启并且使用缓存 proxy_cache mycache; #针对200和304状态码的缓存设置过期时间为8h proxy_cache_valid 200 304 8h; }
proxy_cache_path 设置缓存保存的目录
/usr/local/nginx/upstream_cache是定义的保存缓存的路径
keys_zone 设置共享内存一级占用空间的大小
max_size 设置缓存大小
inactive 超过此时间缓存自动清理
use_temp_path 关闭临时目录
动静分离 什么是动静分离?
动静分离本质是将前端静态资源与我们后端服务的接口分开减小后端服务器的压力,提高静态资源的访问速度(静态资源可以是被缓存的访问起来更快,后端不需要渲染页面)
静态数据:css/js/html/images/audios/videos/…
动态数据:后端接口,不同时间得到的响应可能不同
动静分离的特点
分布式
前后端接口
静态归nginx
接口服务化
动静分离实现方式
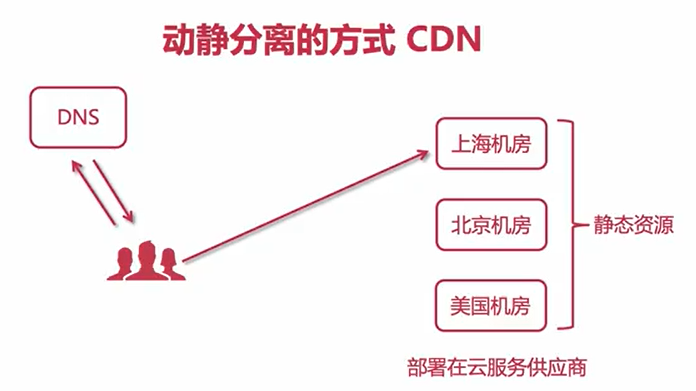
使用cdn加速
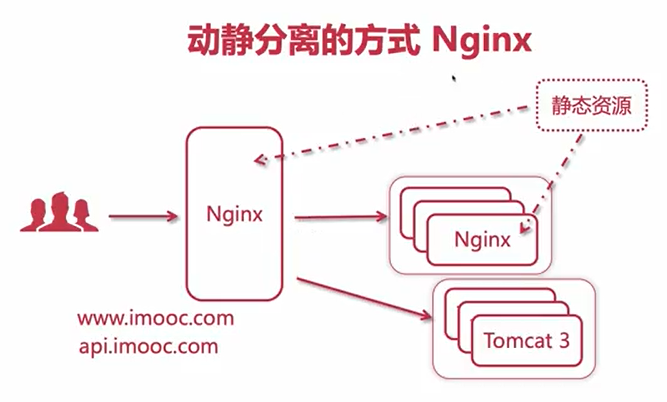
使用nginx实现动静分离
软件推荐
nginx配置管理工具nginxWebUI
自建ngrok,从此抛弃花生壳教程地址
如果本文对你有所帮助,请赏我1个铜板买喵粮自己吃,您的支持是我最大的动力!!!
打赏
微信支付
支付宝
